You will need the following tools:![Top stop Sp10 mount on spiral zipper](data:image/svg+xml;base64,PHN2ZyB4bWxucz0iaHR0cDovL3d3dy53My5vcmcvMjAwMC9zdmciIHdpZHRoPSI4MjAiIGhlaWdodD0iMTUyIiB2aWV3Qm94PSIwIDAgODIwIDE1MiI+PHJlY3Qgd2lkdGg9IjEwMCUiIGhlaWdodD0iMTAwJSIgZmlsbD0iI2NmZDRkYiIvPjwvc3ZnPg==)
![Top stop Sp10 mount on spiral zipper using MPP: 1st step](data:image/svg+xml;base64,PHN2ZyB4bWxucz0iaHR0cDovL3d3dy53My5vcmcvMjAwMC9zdmciIHdpZHRoPSI0MDAiIGhlaWdodD0iMTcwIiB2aWV3Qm94PSIwIDAgNDAwIDE3MCI+PHJlY3Qgd2lkdGg9IjEwMCUiIGhlaWdodD0iMTAwJSIgZmlsbD0iI2NmZDRkYiIvPjwvc3ZnPg==)
![Top stop Sp10 mount on spiral zipper using MPP: 2nd step](data:image/svg+xml;base64,PHN2ZyB4bWxucz0iaHR0cDovL3d3dy53My5vcmcvMjAwMC9zdmciIHdpZHRoPSI0MDAiIGhlaWdodD0iMTcwIiB2aWV3Qm94PSIwIDAgNDAwIDE3MCI+PHJlY3Qgd2lkdGg9IjEwMCUiIGhlaWdodD0iMTAwJSIgZmlsbD0iI2NmZDRkYiIvPjwvc3ZnPg==)
![Top stop Sp10 mount on Spiral zipper using MPP: 3rd step](data:image/svg+xml;base64,PHN2ZyB4bWxucz0iaHR0cDovL3d3dy53My5vcmcvMjAwMC9zdmciIHdpZHRoPSI0MDAiIGhlaWdodD0iMTcxIiB2aWV3Qm94PSIwIDAgNDAwIDE3MSI+PHJlY3Qgd2lkdGg9IjEwMCUiIGhlaWdodD0iMTAwJSIgZmlsbD0iI2NmZDRkYiIvPjwvc3ZnPg==)
![Top stop Sp10 mount on spiral zipper using MPP: 4th step](data:image/svg+xml;base64,PHN2ZyB4bWxucz0iaHR0cDovL3d3dy53My5vcmcvMjAwMC9zdmciIHdpZHRoPSI0MDAiIGhlaWdodD0iMTcyIiB2aWV3Qm94PSIwIDAgNDAwIDE3MiI+PHJlY3Qgd2lkdGg9IjEwMCUiIGhlaWdodD0iMTAwJSIgZmlsbD0iI2NmZDRkYiIvPjwvc3ZnPg==)
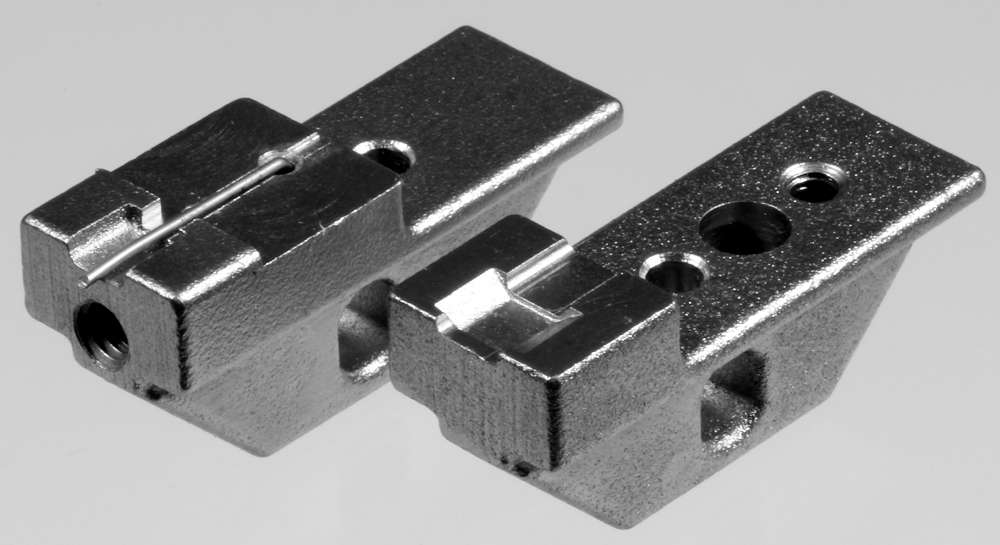
Press jaws for top stops Sp10 with 3 prongs.
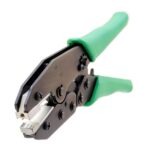
Multi purpose pliers that operate the press jaws
Basic
![Top stop Sp10 mount on spiral zipper](https://www.saxotex.de/wp-content/uploads/sp10-anleitung-0.png)
The top stop is placed on the back of the zipper. The two adjacent prongs should pierce the tape. The single prong should be placed between two rings of the zipper spiral.
Workflow
![Top stop Sp10 mount on spiral zipper using MPP: 1st step](https://www.saxotex.de/wp-content/uploads//sp10-anleitung-1-400x170.png)
1. Insert the top stop under the elastic pin.
![Top stop Sp10 mount on spiral zipper using MPP: 2nd step](https://www.saxotex.de/wp-content/uploads//sp10-anleitung-2-400x170.png)
2. Place one of the two zipper tapes between the press jaws.
![Top stop Sp10 mount on Spiral zipper using MPP: 3rd step](https://www.saxotex.de/wp-content/uploads//sp10-anleitung-3-400x171.png)
3. Press the press jaws together.
![Top stop Sp10 mount on spiral zipper using MPP: 4th step](https://www.saxotex.de/wp-content/uploads//sp10-anleitung-4-400x172.png)
4. Open the pliers.
Then pull the zipper tape out to the front and thus down from the elastic pin.
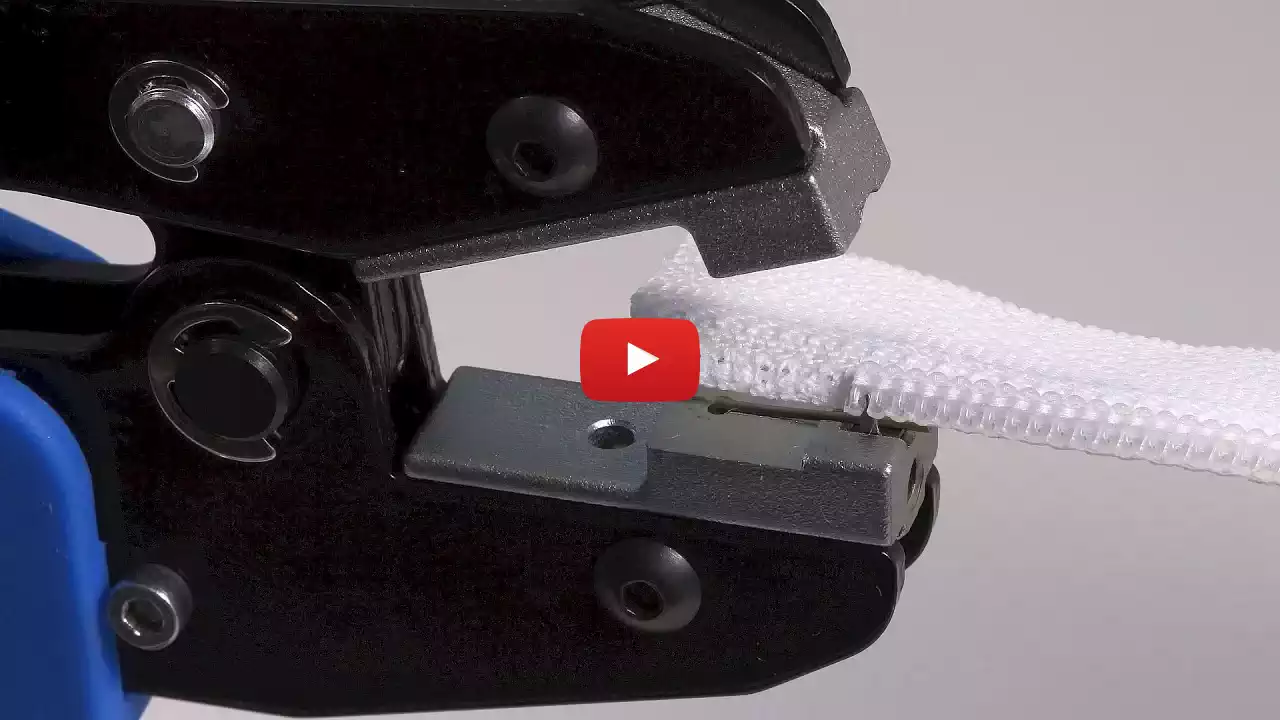
The video below shows how to shorten a No.10 spiral zip fastener with a chain width of about 6 mm and attach Sp10 top stops using professional tools.
Privacy notice: The following video opens in our channel on the YouTube website.
![Start image for video How to shorten a spiral zipper No.10 with a chain width of about 6 mm and attach new top stops Sp10 using professional tools.](https://www.saxotex.de/wp-content/uploads/videoposterbild-ytbutton-spiralreissverschluss-kuerzen-anfangsteile-mit-mfz-anbringen.webp)